
How To Make Your Own Ink From Walnuts

If you love fantasy maps then you probably have an appreciation for hand-drawn illustrations that look like they were made on an expedition into an unknown land. There’s just something about a map that was made with traditional tools that makes it feel like it has a richer history. Because of this, many cartographers choose to draw all their maps with pen and paper rather than digital tools; some even opt to use a traditional dip pen.
But, have you considered going further down the rabbit hole of map-making by creating your own ink from scratch? Sure, you can buy it at the store, but there’s just something more satisfying about knowing you created your own ink, and no one else in the world has an ink exactly like yours.
There are a lot of different traditional methods to create your own ink, but I want to share with you one I recently discovered and tried for myself. Here I’ll walk you through my process and let you see over my shoulder as I attempted to create my own ink using black walnuts!
Finding a Black Walnut Tree

While black walnuts are native to the eastern United States, they have been naturalized throughout much of the lower 48 and much of the world. I am in Oregon, well outside of the traditional range for black walnuts, but there are a lot of these trees growing in neighborhoods and parks in the area. If you or a friend don’t have one of these trees, you can likely find someone in your area who has one in their yard. It doesn’t hurt to knock on their door and ask if you can gather a few. Most of the time people will be happy to share, especially if you tell them a little bit about what you plan to do with them.
What about other types of walnuts? It is my understanding that this process should also work with other varieties of walnuts such as the English walnut (Juglans regia). If you give it a try I would love to hear your results!
Collecting the Walnuts

Black walnuts usually begin dropping from the tree sometime in early Autumn. Once you’ve identified a tree, you can gather the fallen walnuts from the ground. You’ll notice that some of them are more of a yellow-green color, while others are almost black. For the purpose of making ink, either will work but I would tend to favor the darker ones.
Be sure to wear some kind of gloves while you’ll gather unless you want a brown stain on your hands for the next couple of weeks that absolutely won’t wash off! The number you gather depends on the amount of ink you want to make. For this tutorial, I used around 25.
Removing the Hulls

Now that you’ve gathered the walnuts, you can begin removing the husk from around the pit in the middle. This is a messy process so I opted to do it outside where I didn’t mind if anything got stained in the process. Get as much of the husk off as you can and place it in a large pot. Be aware, on the particularly rotten black walnuts you’ll likely find some small worms that have taken up residence. Just ignore them and throw everything into the pot; it will be thoroughly cooked and it’s not like you’re eating it anyway!
Simmering Over Medium Heat
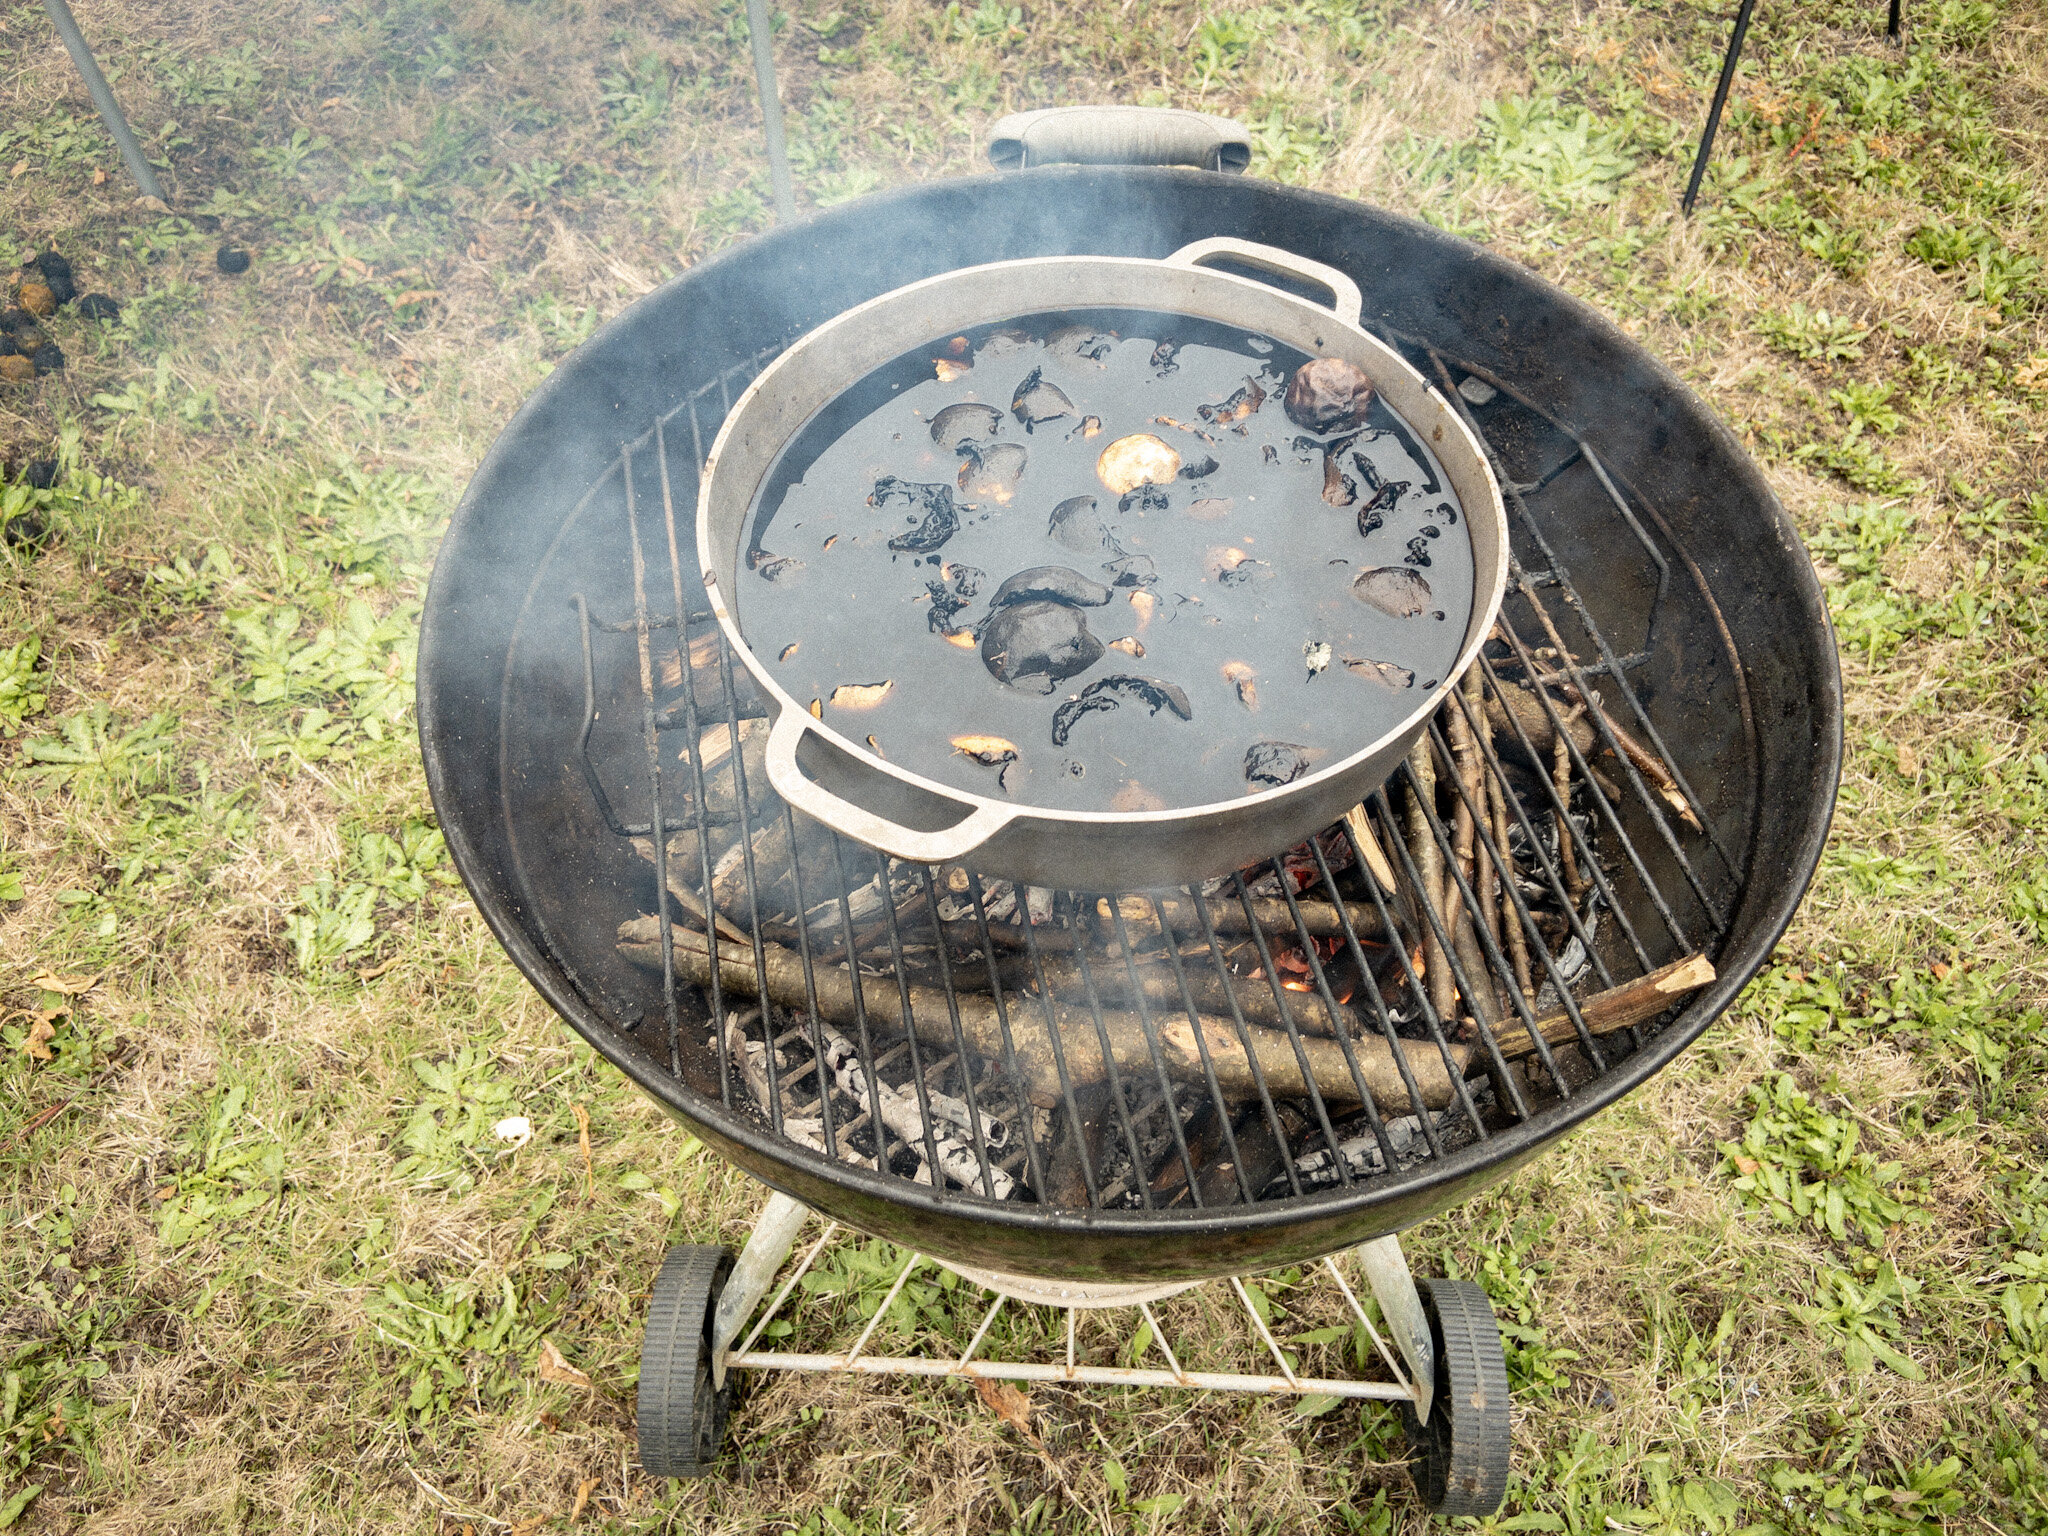
Add some water to the pot with the hulls; just enough to fully cover them. The outer hulls of Black Walnuts have a unique, almost pine-like smell. I personally don’t find it unpleasant, but I’m not sure I want my house to smell like it for the day. For this reason, I opted to make my ink using my grill as a heat source. The goal here is to just let it simmer, not boil, for several hours over medium heat.
Testing the Ink As it Cooks Down

As your concoction cooks, you’ll want to stir it periodically to ensure it doesn’t burn. Have a piece of paper on hand to test the color of the ink as everything cooks down. As it cooks and the water evaporates you should end up with a rich brown color. Have fun and experiment to see how dark you want the final ink.
Cooling & Preparing to Remove Hulls

After about six hours of cooking, I removed the pot from the heat and set it in my garage to cool overnight. The next day I grabbed an old t-shirt and some twine, and a glass bowl so I could strain out all the hulls.
Removing the inky goodness

You can then pour your black walnut slurry through whatever fabric you’re using as a filter. Once it’s in the t-shirt you can use the twine to tie off the top so you don’t end up with a huge mess as you squeeze out the remaining liquid. I spent around 15 minutes squeezing most of the liquid out of the shirt. If you really wanted to be thorough and save every drop, you could also find a place to hang the hull bundle over the bowl and leave it overnight. I determined I had more than enough ink so I just did my best by hand.
Preparing for Storage
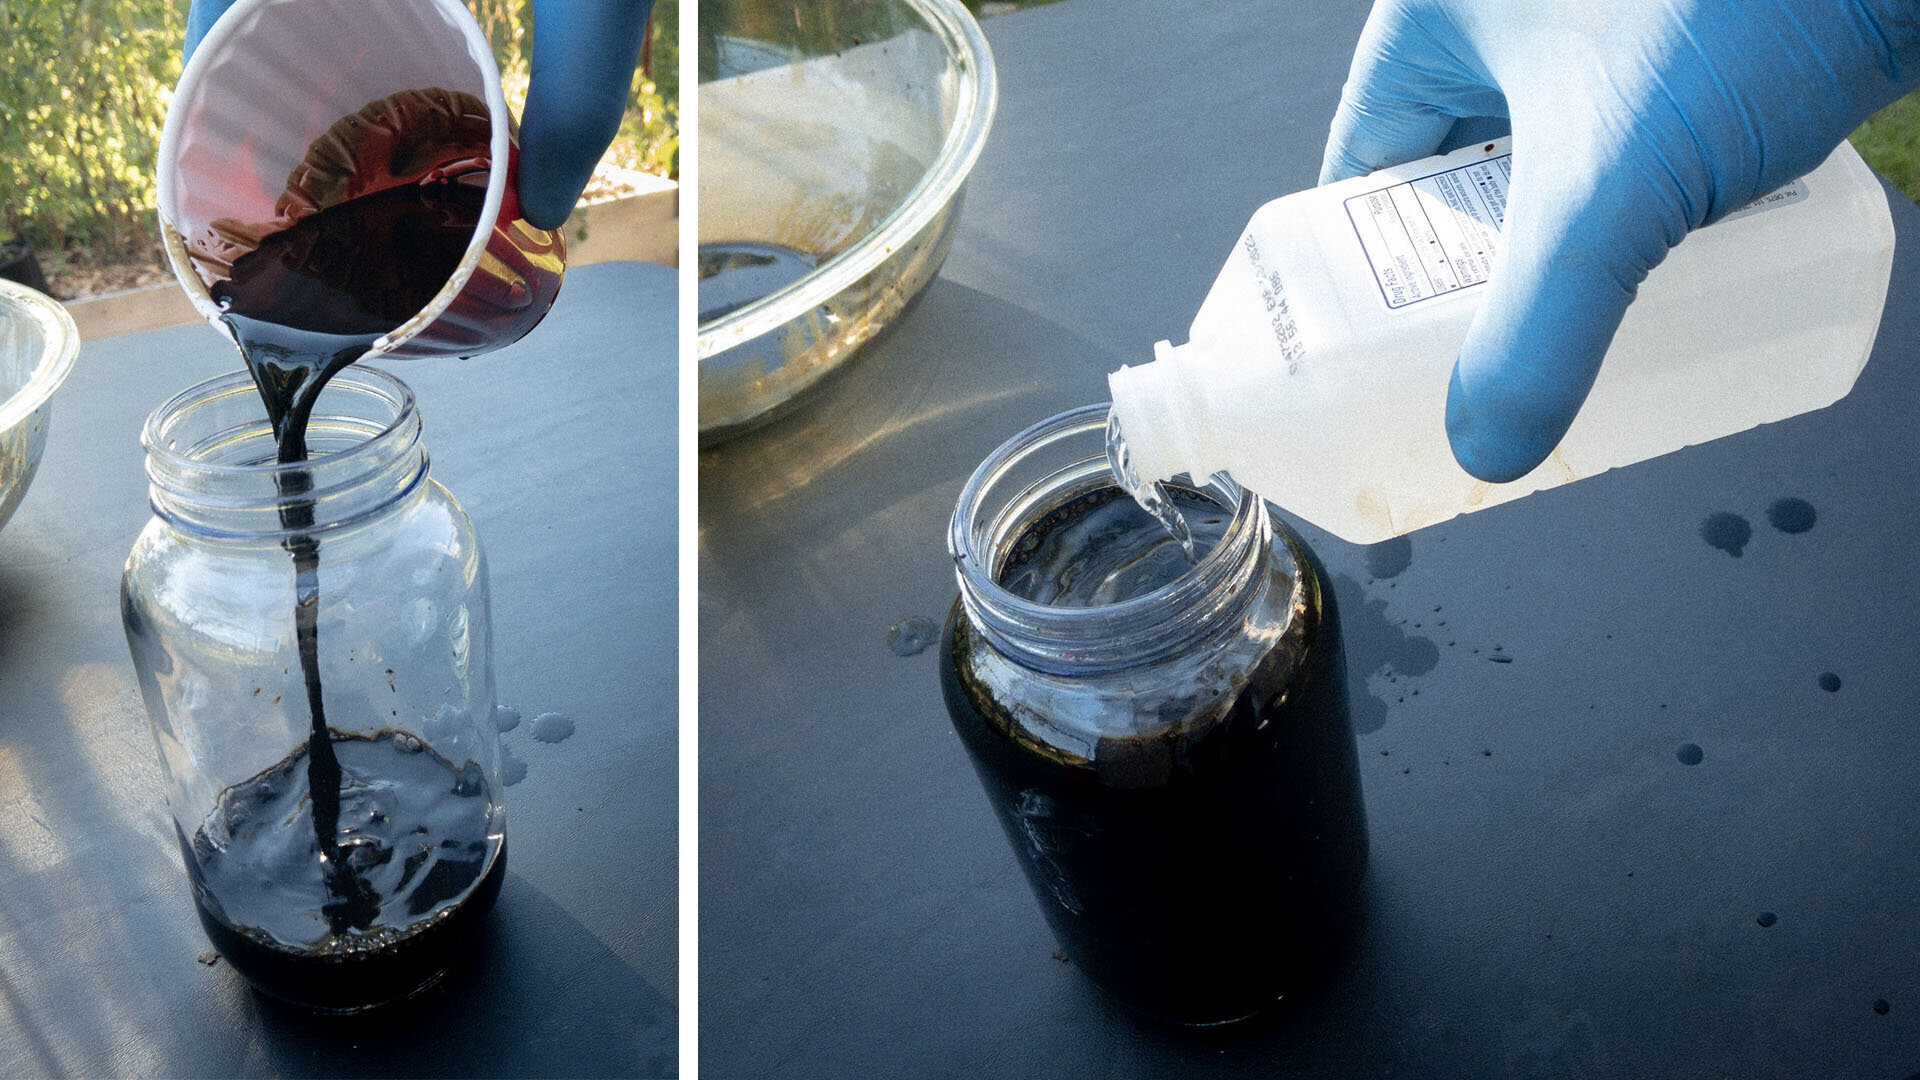
You can now pour your ink into a jar to store for later use. Since this is an organic material, I don’t know what the shelf life would be on its own. But if you want your ink to last a long time then I recommend adding something like rubbing alcohol to make it more shelf-stable. For this batch, my ratio of ink to alcohol was about 15 to 1.
Drawing a Quick Map

Now that the ink was done I was excited to try it out for myself on a map. Admittedly, using dip pens is outside my comfort zone so there was a bit of a learning curve at first. But it was all part of the journey of trying something new and I’m pretty happy with the results. I like the rich brown color of the ink, and the little variations you get from using a material like this. It has a little bit more character and personality than a typical black in you’d buy in the store. It all comes down to your style, and what you enjoy using to map your story!


