
How to Draw a Kraken

What lurks below the surface? If you look at maps throughout history you’ll notice there are often sea monsters or mythical beasts drawn in the seas and oceans. There is something terrifying about knowing there could be a massive predator swimming just below you with no idea that it’s even there.
From a more practical standpoint including something like a kraken or other sea beast is a great way to fill the space in areas of your map that are prone to being a bit blank! In this tutorial, I’ll walk you through some easy steps so you can draw your own kraken on your fantasy maps.
All the brushes used in this tutorial are available in The Modern Map Maker Essential Brushes.

1: Sketch the Tentacles
Begin with a few simple lines just to get an idea where you will place the tentacles for the Kraken. Notice that I am using an organic “S” or “C” curve to give them a good sense of flow and character. Having one overlapping another is also a simple trick to give a greater sense of depth.

2: Ink the Basic Shape
Switch to your pen and ink in the basic shape of the tentacles. Use a curved triangular shape that tapers at the end.
Bonus Tip!
It’s generally a good idea to use an odd number like 3, or 5 for something like this as odd numbers tend to be more visually appealing. The other thing to note is that you should vary the size of the tentacles with some larger and some smaller.
Below you can see a sample of the Chalk Sketcher Brush that I will be using for all the line art in this tutorial. I like that it is pressure sensitive so you can vary the line weight line a brush pen, and has a bit of texture built into it so it looks like you’re using traditional tools.

Chalk Sketcher Brush Sample

3: Give Some Form
You can now give a little sense of form to each tentacle by drawing some broken lines down the sides to indicate the “top” of the tentacles.
Where each arm emerges from the water you can also add a slightly arcing line that curves downward to reflect the isometric perspective of this illustration.
More Tutorials You May Enjoy


4: Draw Wave Lines
Use thinner broken lines draw some organic wave shapes around the arms. Make sure the waves appear like they’re wrapping around and partly hidden by the tentacles to give a greater sense of depth.

5: Finish the Details
You can now draw another row of thinner waves around the ones you added in the previous step. Just make sure they are thinner and more spread out.
The other thing you can do really depends on the scale of your sea monster on your map. If it is large enough to allow for the detail, add a few suction cups to the underside of a couple of the arms that extend past the edge to give depth.
But again, this particular example is much larger than it would appear on most maps. So just adding a couple half circles like you see may be more than enough.

6: Block in the Colors
If you are working digitally, create a new layer below your line art and block in some colors that fit the overall palette of your map.
In this case I still wanted it to match the muted paper texture in the background so I picked a fairly desaturated teal for the water, and a slightly more saturated orange-red for the kraken itself.
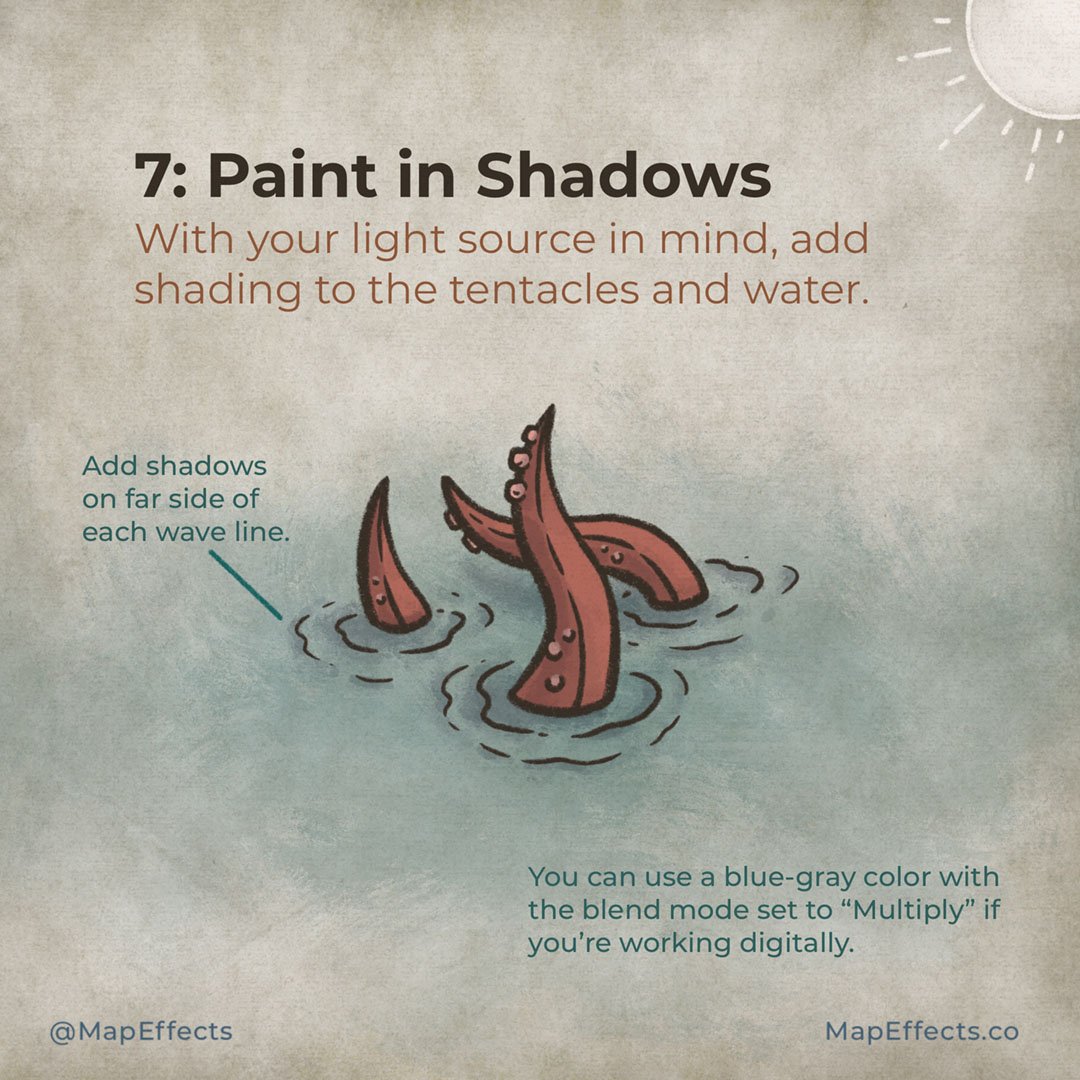
7: Paint Base Shadows
For this example the light source is coming from the upper right, so you can use that as a guide as to where to paint in your shadows. Try to imagine the tentacles as a three-dimension object, and try to imagine where the light would be hidden in order to place your shadows.
If you are working digitally, you can select a blue-gray color and create a new layer with the blend mode set to “Multiply” to paint your shadows.
Below you can see a sample of the Fine Brush Wash I am using for all the shading in this tutorial. I like using a semi-transparent, pressure sensitive brush for shading like this because it allows you to build up tones gradually like you would with watercolors.

Fine Brush Wash Sample

8: Paint the Highlights
Keeping your light source in mind, you can now add a pop of highlights to really make your illustration stand out. Create another new layer and set the blend mode to “Add” or “Screen” and select a bright warm color.
In this case you can make the highlights pretty strong in areas that would receive the most direct light because you want it to appear wet and reflective. You can also paint some squiggles of highlights in the surrounding water to give a little more texture.
A Tip on Blend Modes
“Add” and “Screen” are the main blend modes I use to add highlights. “Screen” tends to wash out most of the saturation while brightening the overall value, while “Add” brightens the values while adding a bit more of the hue you’re painting with. Since I wanted a little warmer light source I decided to use “Add” in this example.
You’re done! If you found this tutorial helpful be sure to follow MapEffects on Instagram and tag me with the map you create and I may feature your work. Thank you, and I look forward to seeing your map!
Josh
