
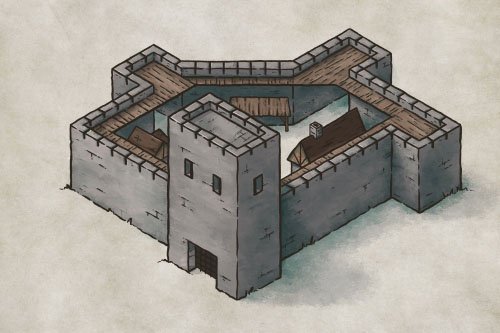
How to Draw An Isometric Fortress

If you want an easy way to draw three-dimensional buildings and structures on your fantasy map, then using an isometric perspective is the method for you! The reason this technique is so achievable is that it really comes down to following a grid. As long as you do that, then you can draw all kinds of things like buildings, towers, or something as complex as a city.
I know this is true because I actually had the opportunity to teach a group of kids, some as young as four, in our homeschool community to draw this exact castle. And I’ll tell you the same thing I told them; if you can draw a straight line and count to 11, you can draw this fortress!
All of the brushes I will be using for this tutorial are available in The Modern Map Maker Essential Brushes for Procreate & Photoshop

Draw the Main Tower
You’ll hear me repeat it throughout this tutorial, but following the grid is the key to drawing structures like this in an isometric perspective. For this first step let’s draw a simple rectangular box to create the main gate or tower of the fortress. I will include the exact number of boxes wide each segment is so you can follow along.
If you want to draw this out on paper, you can download a free isometric grid to print on a standard-size sheet of paper. Just tap the button below!

Add Top Wall
With our main tower in place, let’s add the top of the walls for the fortress. Start at the top of the tower and count down four squares on each side. This will give you the starting place to follow the grid and draw the first line for the walls.
There will be times to cut straight across the squares, as with the top of the furthest wall. Other than moments like this though, you’ll be following the angles of the grid.

Draw Towers & Walls
Now, this is when things start getting satisfying as it starts to really look like a structure. For this step, you can draw down 4 squares to form the main walls. But, let’s also add some defensive towers on our castle using the same principles we went through above.
Then, you can just close off the base of the walls, which you’ll notice follows the same shape as the top of the wall. With those two towers in the back, you’ll want the wall to “disappear” behind the main wall where it would overlap. This can really give your illustration a lot of depth.

Draw Wall Edge
Follow along the top of the walls, and draw a line inset half a square. You’re still following the grid lines, but you’ll be in the middle of the boxes instead of right on the line. Once you’ve done that you can then draw straight down the other half of the square at each visible point to create the inside of the wall. Then you can just connect those points together to close it off for the next step.
More Mapping Tutorials

Add Wall Platform
Now, the soldiers guarding the fortress need somewhere to walk along the top of the wall! Draw a platform one square wide following the inside of the wall. In this example, I did inset the top portion of the walkway just half a square so it doesn’t intersect with the top of the tower and create a visual tangent.
Check out my Map Tip on Avoiding Visual Tangents HERE

Draw Inside Walls
Being at the inner points of the wall, and draw straight down from each to form the inside of the wall. Then close them off at the base as before.

Add Details to Fortress
Keep following that grid and add some more interest to the walls, towers, and features to go inside the fortress. Draw a gate on your main tower, and inset it half a square to give it some more depth. Then add some windows, arrow slits, crenellations along the walls, and some buildings.
If you are working digitally, it sometimes can be helpful to draw the buildings outside the walls and then move them inside when you have a design you’re happy with. Not necessary, but that’s what I tend to prefer.

Modern Map Maker Essential Brushes
$19 | For Procreate & Photoshop
Take the guesswork out of getting started with digital cartography with these essential brushes! Includes 15 of my favorite brushes to get you mapping your story.

Draw in Texture
Everything is starting to come together, but frankly, it looks a little stiff because the lines are too perfect. So at this point, I actually tend to view all the previous steps as a sketch. Whether I’m working digitally or traditionally, this is when I bust out a line art pen go back over all my line art, and allow some imperfections in my lines. We’re drawing a castle here, not a space station!
Go through and add some subtle broken lines on the walls to imply stone blocks, and on the platform to give the impression of boards or wood grain. As always, follow the grid to make sure your lines remain in the right perspective.
Depending on the scale of your map, your icons may appear quite small and may only require a little bit of texture, if any.
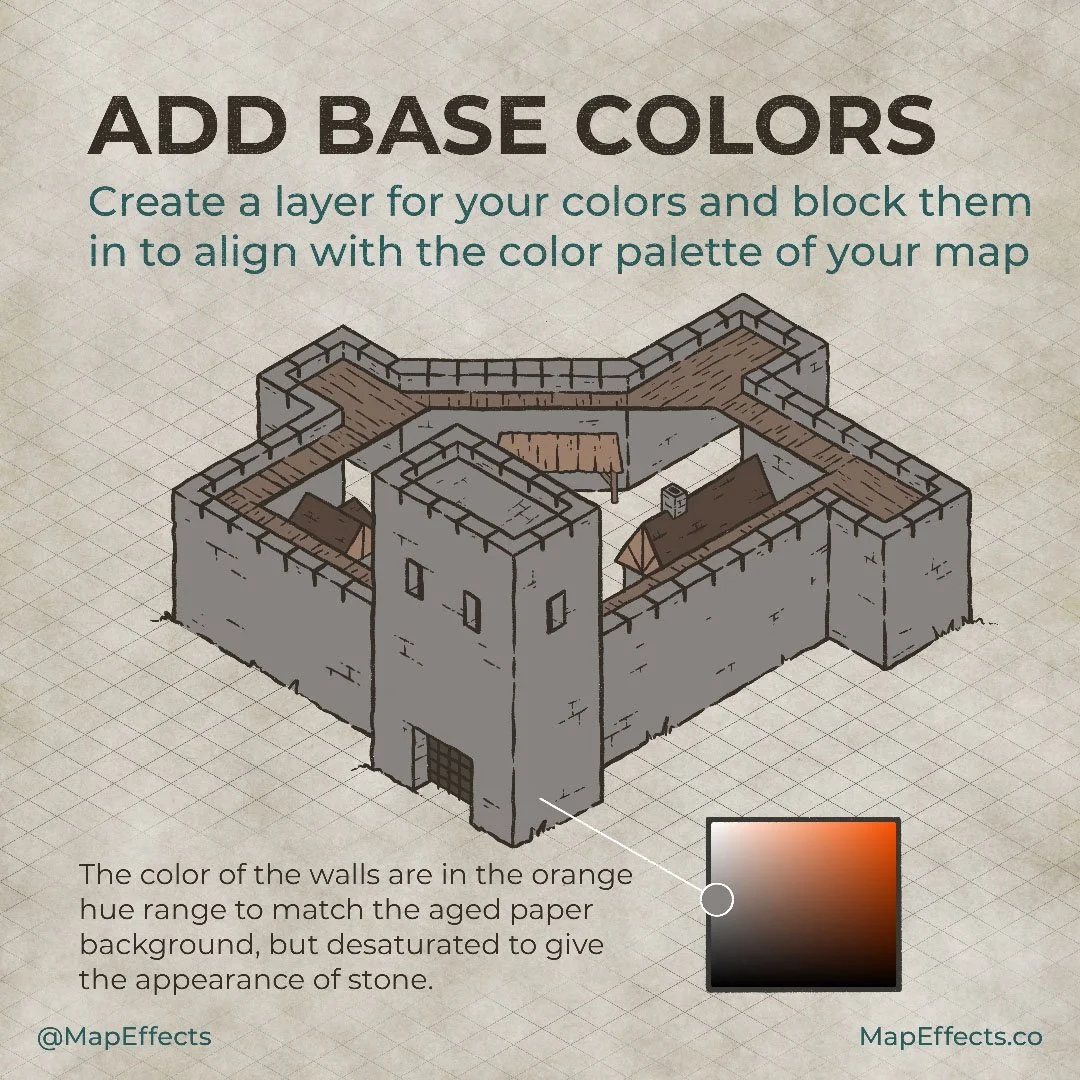
Add The Base Colors
If you are working digitally like me, you can create a new layer below your line art to block in some color. Be sure to choose hues that align with the color palette of your map. The assumption is often that castle walls need to be a blue/gray color, but that isn’t necessarily the case.
I’m using an orange hue for this example to match the aged paper background. By bringing the saturation down significantly though, it gives the impression of stone and has a “cooler” feel even though it’s technically a warm gray.

Add Main Shadows
Decide where your light source will be so you can use it as a guide to block in the main shadows on the walls. This will also inform the placement of the cast shadows from the structure. Including cast shadows is important for making your illustration feel “grounded” with the surrounding terrain. You’ll notice that the angle of the cast shadows is consistent based on your light source.
If you are working digitally, you can easily add shadows by creating a new layer above your color layer, setting the blend mode to “Multiply”, and selecting a medium value, blue/gray color. Then block in your shadows with a low opacity brush so you can build up your shadows gradually.

Deepen Shadows
If you’re using a low-opacity digital brush, watercolor, or even markers, you can now make another pass through the shadows to darken some areas. Look for inside corners, where things overlap, and near the tops of the walls and towers.

Blend & Texture Shadows
While you can keep the harder edges, I like to use a texture brush as a smudge tool to soften the edges of the shadows. The textured nature of the brush is what helps to prevent the transitions from looking too smooth and digital.
Get the Free Smudge Brush by Tapping the Button Below

Add Some Light
With all the shadows in place, you can now add some pops of light to brighten the areas most directly hit by your light source. For digital artists, you can do this by creating another layer above your shadows, and setting the blend mode to “Add” or “Screen”. Then, select a light gray with just a bit of yellow or warmth to it. Use your low-opacity brush then to block in light on the towers, walls, and buildings.
Be sure to keep using that smudge tool throughout to blend values together and add some texture!

Paint the Final Highlights
This last step is subtle, but can add some pop and contrast to your fortress. Using the same brush and settings as before, paint stronger highlights along the top edge of the wall where the light would catch the sharp edge.
You can then also add some more highlights in areas like the stone and wood to bring out some texture.
NOW DRAW YOUR MAP!

You’re all done! I hope you found this tutorial helpful and that you feel equipped to start drawing all kinds of structures on your fantasy maps in isometric perspective. Stick to your grid and you can create some pretty awesome things
Happy Mapping!
Josh


